This article talks about Microsoft Teams Auto Attendant
Microsoft Teams Auto Attendant
Microsoft Teams Auto Attendant serve as virtual receptionists, greeting callers, understanding their needs through menu options, and intelligently routing them to the right department, team, or individual. Whether you’re managing a small startup or a large enterprise with hundreds of employees, Auto Attendant provides a scalable, cloud-native approach to call management that integrates seamlessly with Microsoft Teams and Office 365.
In this comprehensive guide, we’ll walk through everything you need to know to design, deploy, and optimize Auto Attendants in your organization.
Microsoft Teams Auto Attendant architecture
Core Concepts and Components
An Auto-Attendant in Microsoft Teams is a cloud-based service that accepts incoming calls and uses voice prompts (text-to-speech) and dial-by-name directories to route callers without human intervention. Let’s examine the key components:
- Voice Recognition and Menu Processing: The system accepts DTMF (Dual-Tone Multi-Frequency) input or spoken responses, allowing callers to navigate through menu options or dial extensions directly.
- Call Routing Logic: Based on the caller’s selection, the system applies routing rules to direct the call to the appropriate destination—whether that’s a call queue, a specific user, another Auto-Attendant, or voicemail.
- Interactive Voice Response (IVR): Text-to-speech technology generates professional-sounding voice prompts dynamically, or you can upload pre-recorded audio files for a more branded experience.
- Call Routing and Escalation: Auto Attendants can be configured with multiple levels of menus, allowing for sophisticated routing hierarchies. When calls cannot be answered, automatic escalation ensures the caller reaches an appropriate resource.
- Integration with Call Queues: Auto Attendants work in tandem with Call Queues to distribute calls across teams, manage hold times, and optimize resource utilization.
How Auto Attendant Differs from Call Queues
A common point of confusion is the relationship between Auto-Attendants and Call Queues. While they’re often used together, they serve different purposes:
- Auto Attendant: Handles call reception and initial routing. It processes caller input and directs calls based on menu selections or dial-by-name directories. Think of it as your first-line IVR system.
- Call Queue: Manages the distribution of calls to a group of agents. Once a caller has been routed via the Auto-Attendant, they may enter a Call Queue where they wait for the next available agent. Call Queues handle load balancing, agent availability, and queue management.
Prerequisites and Licensing Requirements
Before you begin setting up Auto Attendants, ensure your organization meets the following requirements:
Licensing
- Microsoft Teams Phone: Every organization deploying Auto-Attendants requires a Teams Phone license (formerly PSTN Calling). This can be purchased as a standalone license or bundled with Microsoft 365 Business Voice.
- Calling Plans or Direct Routing: You need either a Microsoft Teams Calling Plan (for cloud-based PSTN connectivity) or Direct Routing (for on-premises SIP trunks). This provides the actual phone number and PSTN connectivity.
- Resource Account License: Each Auto-Attendant and Call Queue requires a Resource Account with an appropriate license (free Resource Account license or Phone System license).
Technical Requirements
- Azure AD (Microsoft Entra ID) access with appropriate administrative roles
- Teams Admin Center access or PowerShell permissions
- At least one phone number available for the Auto Attendant (obtained through Calling Plans or Direct Routing)
- For on-premises scenarios: Skype for Business Server 2019 or Teams Phone System properly configured
Step-by-Step: Creating Your First Auto Attendant
Step 1: Create a Resource Account
The foundation of every Auto Attendant is a Resource Account. This is a special user account in Azure AD that holds the phone number and acts as the identity for your Auto Attendant.
Creating a Resource Account via Teams Admin Center:
- Navigate to Teams Admin Center (admin.teams.microsoft.com)
- Go to Voice > Org-wide settings > Resource accounts
- Click “+ Add” to create a new resource account
- Enter a Display name (e.g., “Main Auto Attendant”)
- Specify a username (must be unique in your tenant)
- Select the resource account type: “Auto Attendant”
- Click Create
The account will be created, but it won’t be assigned a phone number yet. You’ll do that after setting up the Auto Attendant itself.
Creating a Resource Account via PowerShell:
If you prefer PowerShell, use the following commands:
$displayName = "Main Auto Attendant"
$username = "mainaa"

# Create the resource account
New-CsOnlineApplicationInstance -UserPrincipalName $username@microbrother.com `
  -DisplayName $displayName -ApplicationId 11cd3e97-eb45-4628-aec2-d3ad8e25910d
Step 2: Configure the Auto Attendant
With the resource account created, you’re ready to configure the Auto Attendant behavior:
- In Teams Admin Center, navigate to Voice > Auto attendants
- Click “+ New auto attendant”
- Enter a name for your Auto Attendant (e.g., “Main AA”)
- Click Create
Now you’re in the Auto Attendant configuration page. There are several sections to configure:
2a. Call Answering and Greeting
This is where you configure what happens when someone calls your Auto Attendant:
- Greeting Message: Choose between a text-to-speech message (generated automatically) or upload a pre-recorded audio file (.wav format). A text-to-speech greeting might be: “Welcome to Contoso Corporation. For sales, press 1. For support, press 2. For directory, say your contact’s name.”
- Call Routing: After the greeting, you must specify where the call goes. Options include: disconnect, route to a call queue, route to another Auto Attendant, route to a specific user, or route to an external phone number.
2b. Call Menu Options
Create a menu with keypad options (1-9, 0, *) and voice command options:
- Dial by Extension: Allow callers to enter a user’s extension directly
- Dial by Name: Enable speech or DTMF (touch-tone) entry to search by name
- Custom Menu Options: Define key 1, 2, 3, etc., each routing to a specific destination
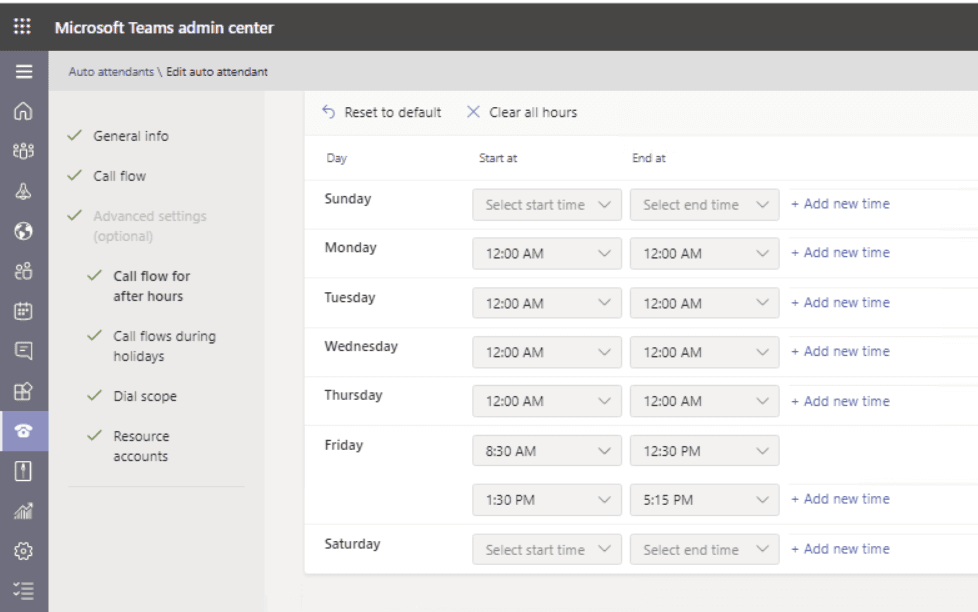
2c. Call Handling for Different Times
Microsoft Teams Auto Attendant allows you to define different routing behavior based on the time of day and day of week:
- Business Hours: Typical 9 AM to 5 PM routing
- After Hours: Route to voicemail or a different queue after business hours
- Holidays and Exceptions: Define company holidays when different routing applies
Step 3: Assign a Phone Number
For your Auto Attendant to receive calls, it must have a phone number assigned to the resource account:
- Verify you have an unassigned phone number (obtain from Calling Plans or Direct Routing)
- In Teams Admin Center, go to Voice > Phone numbers
- Select the unassigned number and click Edit
- Under “Assign to”, select the resource account you created earlier
- Click Save
Step 4: Test and Publish
Before going live, thoroughly test your Auto Attendant:
- Call the phone number from an external line and verify the greeting plays
- Test each menu option (press 1, 2, 3, etc.)
- Verify callers are routed to the correct destinations
- Test after-hours and weekend routing
- Verify dial-by-name functionality works properly
Advanced Configuration Strategies
Building Multi-Level Menu Hierarchies
For larger organizations, a single Auto Attendant with one set of menu options may be insufficient. You can create a hierarchy by routing menu options to other Auto Attendants:
- Main Auto Attendant: Handles initial routing to departments (Sales, Support, HR, Finance)
- Department Auto Attendants: Each department has its own Auto Attendant with team-specific options
- Team Queues: Finally, callers reach call queues where agents are available
This approach provides a professional, scalable solution that doesn’t overwhelm callers with too many menu options upfront.
Integration with Call Queues
When routing calls from an Auto Attendant to a Call Queue, consider these best practices:
- Queue Strategy: Use “longest idle” distribution (routes to the agent who has been idle the longest) for more balanced load distribution, or “round robin” for simpler scenarios.
- Presence-Based Routing: Enable this so only agents with “Available” or “Focused” status receive calls, preventing calls from going to busy agents.
- Music on Hold: Configure pleasant music while callers wait to reduce perceived wait times.
- Overflow Handling: Define what happens if all agents are busy—route to another queue, voicemail, or a specific person.
Using Dial-by-Name Directory
The dial-by-name feature is powerful for organizations where callers may not know the extension or department:
- Speech Recognition: Enable voice input so callers can say “John Smith” instead of searching letter by letter.
- DTMF Input: Keep DTMF enabled for accessibility and reliability, especially for mobile callers or those in noisy environments.
- Directory Scope: By default, the directory searches your entire organization. For large organizations, consider limiting the directory scope to specific groups or departments to reduce confusion.
Best Practices for Auto Attendant Design
Greeting and Message Best Practices
- Keep it Concise: Aim for greeting messages under 15 seconds. Every additional second increases abandon rates.
- Be Professional: Use high-quality pre-recorded greetings for better impressions. Text-to-speech is acceptable for dynamic content like times and dates.
- Include an Escape Route: Always offer a way to reach a human (press 0, say “operator”) to prevent frustrated callers from hanging up.
- Avoid Unnecessary Transfers: Each transfer to another Auto Attendant can cause callers to abandon the call. Minimize menu depth.
Menu Design Principles
- Limit Menu Options: Use no more than 6 menu options per level. Beyond that, callers struggle to remember choices.
- Logical Grouping: Organize options by caller need, not organizational structure. “For sales inquiries, press 1” is better than “For the northeast division, press 1.”
- Clear Language: Use action-oriented language. “Press 1 to place an order” is clearer than “Press 1 for sales.”
- Consider Defaults: Route the most common caller need to an easily remembered key (typically 1).
Availability and After-Hours Routing
- Define Clear Hours: Set business hours explicitly. Consider regional differences if you operate across time zones.
- Holiday Coverage: Create exception rules for holidays. A greeting like “We are closed for the holiday” with voicemail routing is better than routing to no one.
- Escalation Path: Always have an escalation for critical situations—an on-call manager number or emergency contact option.
Monitoring and Optimization
- Track Call Metrics: Monitor call volume, abandon rates, and average wait times. Use the Teams admin reports to identify bottlenecks.
- Gather Feedback: Consider post-call surveys to understand caller satisfaction with the Auto Attendant experience.
- Refine Regularly: Based on data, adjust menu options, routing rules, and messages quarterly.
Troubleshooting Common Issues
Callers Cannot Reach the Auto Attendant
- Check phone number assignment: Verify the number is assigned to the correct resource account.
- Verify licensing: Ensure the resource account has the proper license assigned.
- Check network connectivity: If using Direct Routing, verify the SIP trunk is operational.
- Review firewall rules: Ensure inbound calls aren’t being blocked at the network level.
Menu Options Not Working
- Test key-press routing: Call and manually test each key option.
- Verify destination availability: If routing to a user, ensure they’re active and accepting calls.
- Check call queue status: If routing to a queue, verify agents are assigned and available.
- Review configuration: Go back to Teams Admin Center and verify all routing rules are correctly saved.
Dial-by-Name Not Finding Users
- Verify name format: Ensure users have proper display names in the Global Address List.
- Check directory scope: If limiting to a group, verify the user is in that group.
- Clear directory cache: Dial-by-name uses cached directory data; changes may take up to 2 hours to propagate.
Advanced Configuration with PowerShell
While the Teams Admin Center provides a user-friendly interface, PowerShell offers advanced scripting capabilities for bulk operations and complex configurations. Here are some essential PowerShell commands:
Creating an Auto Attendant via PowerShell
# Connect to Teams PowerShell
Connect-MicrosoftTeams

# Get the resource account
$resourceAccountId = (Get-CsOnlineApplicationInstance -Identity "mainaa@yourdomain.com").ObjectId

# Create auto attendant
$name = "Main Auto Attendant"
$timeZone = "Eastern Standard Time"

$greetingPrompt = New-CsAutoAttendantPrompt -TextToSpeechPrompt "Microbrother."

$menuOptions = @()
$menuOptions += New-CsAutoAttendantMenuOption -DtmfResponse Tone1 -Action TransferToOperator
$menuOptions += New-CsAutoAttendantMenuOption -DtmfResponse Tone2 -Action TransferToCallQueue -CallQueueId (Get-CsCallQueue -NameFilter "Support Queue").Identity

$menu = New-CsAutoAttendantMenu -Name "Main Menu" -Prompts $greetingPrompt -MenuOptions $menuOptions

$callFlow = New-CsAutoAttendantCallFlow -Name "DefaultCallFlow" -Menu $menu

$autoAttendant = New-CsAutoAttendant -Name $name -ApplicationInstanceAssociations @($resourceAccountId) -DefaultCallFlow $callFlow -TimeZoneId $timeZone

Write-Host "Auto Attendant created with ID: $($autoAttendant.Identity)"
Retrieving and Modifying Existing Auto Attendants
# List all auto attendants
Get-CsAutoAttendant

# Get a specific auto attendant
$aa = Get-CsAutoAttendant -NameFilter "Main Auto Attendant"

# Update the greeting
$newPrompt = New-CsAutoAttendantPrompt -TextToSpeechPrompt "Thank you for calling Microbrother. Your call is important to us."
$aa.DefaultCallFlow.Menu.Prompts = @($newPrompt)
Set-CsAutoAttendant -Instance $aa
Conclusion
Microsoft Teams Auto Attendant represents a paradigm shift in how organizations approach call management. No longer confined to expensive, complex legacy PBX systems, modern cloud-based Auto Attendants offer flexibility, scalability, and professional call handling right within the Microsoft 365 ecosystem.
Whether you’re a small organization implementing your first Auto Attendant or an enterprise fine-tuning a sophisticated multi-level routing hierarchy, the principles we’ve covered—clear menu design, thoughtful routing logic, proper testing, and continuous optimization—apply universally.
Start with a simple configuration, test thoroughly, and gradually add complexity as your organization’s needs evolve. Remember that the best Auto Attendant is one that serves your callers’ needs while minimizing frustration and keeping them connected to the right resources quickly.
As you implement Auto Attendants in your organization, keep learning from call metrics, user feedback, and emerging features. Microsoft regularly enhances Teams voice capabilities, so stay informed about updates that might improve your setup.
Happy calling!
You can also read this article to create https://microbrother.com/voicemail-policies-in-microsoft-teams/ voice mail policies in MS Teams
Thank you 😇