This article talks about on how to Create Service Accounts in Microsoft Teams
Service Accounts
In any enterprise environment that relies on Microsoft Teams as its primary collaboration hub, managing non-human identities is just as important as managing user accounts. Whether you are running automated bots, integrating third-party applications, or orchestrating DevOps pipelines, service accounts are the backbone of secure, programmatic interaction with the Teams platform.
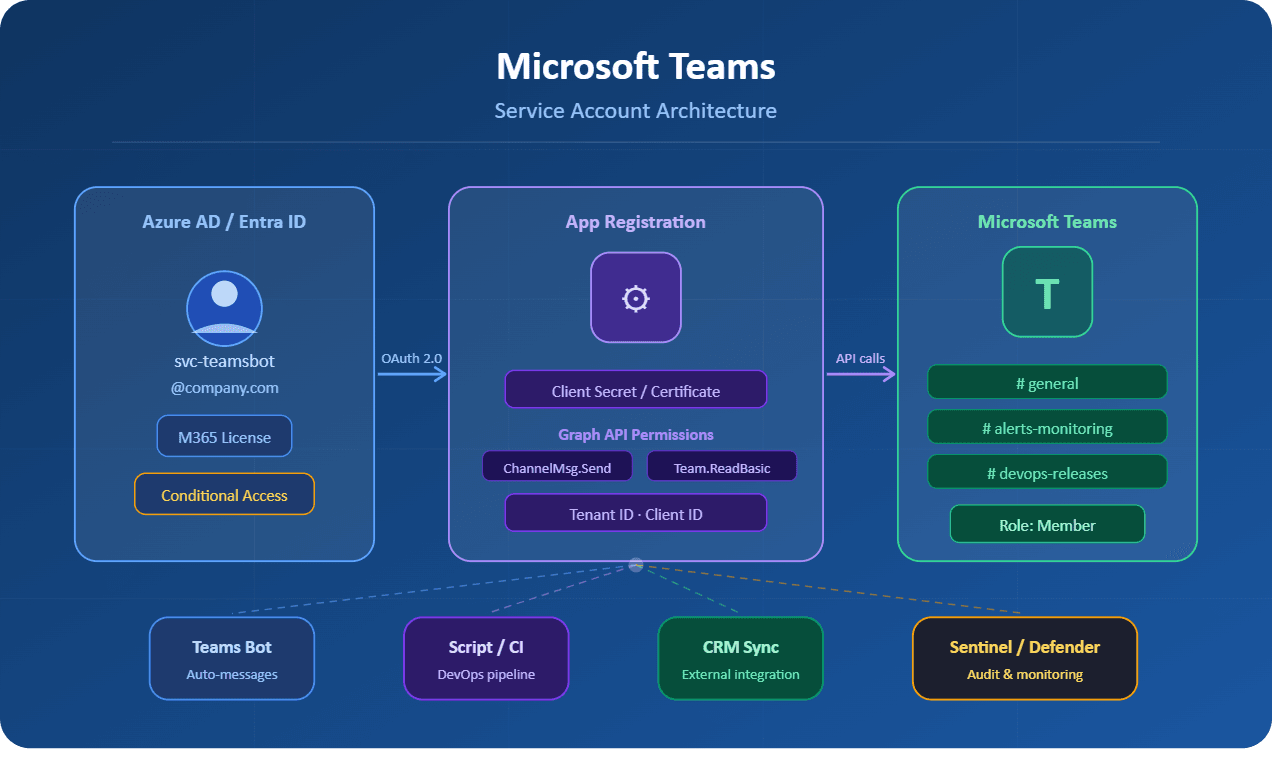
A service account is a dedicated, non-interactive identity created specifically for machine-to-machine communication. Unlike regular user accounts, these accounts are not tied to a single person and are designed to operate under tightly scoped permissions, making them ideal for automation, integrations, and background processes.
This guide walks you through the complete process of setting up service accounts in Microsoft Teams, from provisioning in Azure Active Directory (now Microsoft Entra ID) to applying the correct licensing and locking down permissions to follow the principle of least privilege.
What Is a Service Account in Microsoft Teams?
Before diving into the how, it is worth clarifying the what. In the context of Microsoft Teams and Microsoft 365, a service account is a licensed Azure AD (Entra ID) user account that is:
- Not associated with a human employee.
- Used exclusively by applications, bots, scripts, or automated processes.
- Assigned only the permissions required for its specific task.
- Protected from interactive sign-in by policy or conditional access rules.
- Monitored centrally with dedicated audit logging.
Common real-world examples include a Teams bot that sends daily standups, a monitoring agent that posts alerts to a channel, or an integration service that syncs data from an external CRM into a Teams tab.
Prerequisites
Before proceeding, ensure that you have the following in place:
- Microsoft 365 admin privileges (Global Administrator or User Administrator role).
- Access to the Microsoft 365 Admin Center (admin.microsoft.com) and the Azure portal (portal.azure.com).
- An available Microsoft Teams-compatible license (Microsoft 365 Business Basic or higher, or a Teams Essentials license).
- A clear understanding of what the service account will be doing and which Teams resources it will access.
- Multi-factor authentication policies reviewed and accounted for.
Step-by-Step: Creating a Service Account for Microsoft Teams
Step 1: Create a New User Account in Microsoft 365 Admin Center
The first step is provisioning a dedicated user account that will serve as your service identity. Navigate to admin.microsoft.com, sign in with your administrator credentials, and follow this path:
- In the left navigation panel, go to Users > Active Users.
- Click Add a user at the top of the user list.
- In the Basics tab, enter a meaningful display name (e.g., Teams-AutoBot-Prod or Integration-CRM-Service).
- For the username, use a naming convention that clearly distinguishes it from human accounts, such as svc-teamsbot@yourdomain.com.
- Uncheck the option to automatically create a password, and instead set a strong, randomly generated password. Store this securely in your organization’s vault (e.g., Azure Key Vault or HashiCorp Vault).
- Disable the Require this user to change their password when they first sign in option, since service accounts do not perform interactive logins.
Step 2: Assign a Microsoft Teams License
Service accounts that interact with Teams must have an appropriate license assigned. Without a valid license, the account cannot send messages, join teams, or use Teams APIs. Still in the Add a user wizard:
- Move to the Product licenses tab.
- Select the appropriate license. For most bot and integration scenarios, Microsoft 365 Business Basic is sufficient. If your service account needs full phone system capabilities (e.g., for call queues), you may need a Teams Phone Resource Account license instead.
- Complete the wizard and click Finish adding to create the account.
Pro Tip: If you are only using the account for automation via the Microsoft Graph API and do not need the account to appear as a Teams user, consider using an App Registration instead of a licensed user account. However, for scenarios where the account must appear as a participant in channels or chats, a licensed user account is mandatory.
Step 3: Configure the Account in Azure Active Directory (Entra ID)
Once the account exists in Microsoft 365, head over to portal.azure.com to refine its identity properties and security posture.
- Navigate to Azure Active Directory > Users and locate your newly created service account.
- Click on the account and open the Properties tab. Set the Job Title to Service Account and the Department to the owning team (e.g., Platform Engineering). This helps with auditing and identity governance.
- Under Authentication methods, ensure that no personal authenticator apps or phone numbers are registered. Service accounts should not have self-service password reset configured unless explicitly required.
- Optionally, add a manager attribute pointing to the team lead responsible for this service account. This establishes an accountability chain for access reviews.
Step 4: Apply Conditional Access Policies
One of the most critical hardening steps is blocking interactive login for service accounts. You do not want a human being able to sign into this account from a browser or Teams desktop client.
- In Azure AD, go to Security > Conditional Access > Policies.
- Create a new policy. Give it a descriptive name such as Block Interactive Login – Service Accounts.
- Under Assignments > Users, target your service account (or a dedicated security group containing all service accounts).
- Under Access Controls > Grant, select Block access.
- Under Conditions > Client apps, include Browser and Mobile apps and desktop clients.
- Enable the policy and set it to On.
Important: Always test Conditional Access policies in Report-only mode before enabling them. A misconfigured policy can inadvertently lock out legitimate accounts.
Step 5: Add the Service Account to the Appropriate Teams and Channels
Now that the account is secured, it needs to be granted access only to the Teams and channels it requires. Follow the principle of least privilege here.
- Open Microsoft Teams and navigate to the target team.
- Click the ellipsis (three dots) next to the team name and select Manage team.
- Under the Members tab, click Add member and search for your service account by display name or email.
- Assign the appropriate role. For most automation scenarios, the Member role is sufficient. Only grant the Owner role if the service account needs to manage the team itself.
- Repeat for each team and channel the service account requires access to. Avoid adding it to teams organization-wide.
Step 6: Register an App in Azure AD (for API Access)
If your service account needs to authenticate programmatically via the Microsoft Graph API or Teams API, you will need to pair it with an App Registration.
- In Azure AD, navigate to App registrations > New registration.
- Give the application a meaningful name (e.g., TeamsBot-CRM-Sync) and set the supported account types to Accounts in this organizational directory only.
- After registration, go to Certificates & secrets and generate a new client secret. Copy the value immediately and store it in your secrets manager.
- Navigate to API permissions and add the required Microsoft Graph permissions. For example, ChannelMessage.Send, Team.ReadBasic.All, or Channel.ReadBasic.All depending on your use case.
- Click Grant admin consent to activate the permissions.
- Note down the Application (client) ID and Directory (tenant) ID. Your application will use these along with the client secret to authenticate via OAuth 2.0 client credentials flow.
Security Best Practices for Teams Service Accounts
Creating the account is only half the job. Keeping it secure over its lifetime is equally important. Here are the key security practices every admin should implement:
| Practice | Details |
| Rotate credentials regularly | Rotate client secrets and passwords at least every 90 days. Use Azure Key Vault to automate this process. |
| Enable audit logging | Turn on unified audit logging in the Microsoft 365 Security & Compliance Center to track all activity by the service account. |
| Use Managed Identities where possible | For Azure-hosted workloads, prefer Managed Identities over client secrets. Credentials are managed automatically. |
| Tag with lifecycle metadata | Set expiry dates and ownership attributes on both the user account and app registration to facilitate access reviews. |
| Monitor for anomalies | Configure Microsoft Sentinel or Defender for Cloud Apps to alert on unusual activity from service account identities. |
| Document everything | Maintain a central inventory of all service accounts with their purpose, owner, and access scope. |
Resource Accounts vs. Service Accounts: Know the Difference
Many administrators confuse resource accounts with service accounts. While both are non-human identities in Microsoft Teams, they serve very different purposes.
A Resource Account in Teams is a specialized identity tied specifically to voice features: call queues and auto attendants. These are created directly in the Teams Admin Center under Voice > Resource Accounts, are assigned a free Microsoft Teams Phone Resource Account license, and cannot be used for messaging or general API access.
A Service Account, as described in this guide, is a general-purpose identity for automation, bots, and integrations. It requires a standard Teams-compatible license and is managed primarily through Azure AD. When in doubt, ask yourself: is this for a phone system feature? If yes, use a Resource Account. If it is for anything else, use a Service Account.
Troubleshooting Common Issues
Even experienced admins encounter friction when setting up service accounts. Here are the most common issues and how to resolve them:
Issue: The service account cannot send messages
Resolution: Verify that a valid Teams license is assigned and that the account is an active member of the target team or channel. Check that no message policies are blocking the account.
Issue: Authentication fails with 401 Unauthorized
Resolution: Confirm that admin consent has been granted for all API permissions in the App Registration. Also verify that the client secret has not expired.
Issue: The account is unexpectedly blocked from sign-in
Resolution: Review your Conditional Access policies. Ensure the service account is excluded from MFA policies if it uses certificate-based or client credential auth flows.
Issue: Bot messages appear under the wrong identity
Resolution: Make sure your bot framework is using the correct service account credentials and that the App Registration is correctly linked to the Bot Channel Registration in Azure.
Issue: License assignment fails
Resolution: Your tenant may have reached its license limit. Review your Microsoft 365 subscriptions in the admin center and purchase additional seats if needed.
Conclusion
Service accounts are foundational to any mature Microsoft Teams deployment. When properly configured, they allow your organization to automate workflows, integrate third-party tools, and operate background services without tying identities to individuals who might leave the organization or change roles.
The process, while involving several administrative portals, is straightforward when approached step by step: provision the account in Microsoft 365, secure it in Azure AD, apply conditional access policies, grant scoped access to Teams resources, and pair it with an App Registration for programmatic access.
Equally important is what happens after creation. Treat service accounts like any other privileged identity: rotate their secrets, review their access quarterly, monitor their activity, and document their purpose. A well-governed service account is one that your security team will never have to worry about.
Also you can read https://microbrother.com/complete-roadmap-from-zero-production-call-queues/ this article to create Call queue in MS Teams
Thank you 😇